Photography on the Class Digital-Microscope

Mathew Peet

Digital images can be transferred to your own filespace by logging in with your MSM identifier. The microscope is similar to the other class microscopes but can be used in both reflected and transmitted light.


Taking Pictures:


  1. Switch on the light you would like to use, and select a suitable brightness.

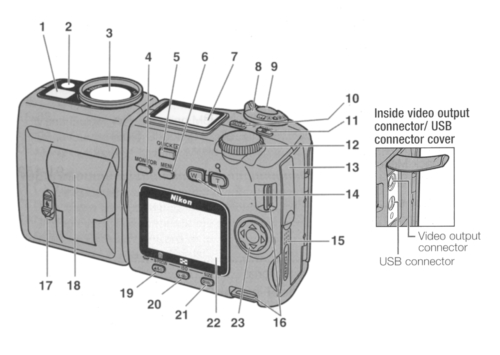
  2. Switch on the camera, by turning the mode dial [8] to position A.

  3. Ensure the light path selector is in the correct position. With the plunger in the middle position light is split between the eyepieces and the camera. V = View, CV = Camera and View, C = Camera.

  4. Focus the microscope till the image is viewable on the LCD display. If you avoid zooming the microscope you can use the calibrated values above the microscope when adding a micron marker to your micrographs. Otherwise you will need to use a graticule to do your own calibration.

  5. The camera should autofocus when you take a picture, by holding the shutter [9] down but not pressing it fully you can focus the image.

  6. Pressing the shutter when taking the picture can result in a blurred picture, To avoid this use the camera timer, by pressing the Left hand button below the viewing screen [19] three times, (a clock icon will appears on the screen), before pressing the shutter. The camera will count down for ten seconds and take the picture.

  7. Keep a note of what the micrograph shows (sample/feature) and at what magnification.


Transferring Pictures


  1. Log in to the computer.

  2. Plug the USB lead into the camera. This plugs into the I/O Digital connector [13] on the right hand side of the camera. The Nikon view program should start and give you a thumbnail view of the photographs on the camera.

  3. The default location for images is C:\Program Files\Nikon\NkView4\Images\{Date_Time}\images.jpg, you may like to change this in preferences, if so please change it back. The images will be sequentially numbered in the order you transfer them, you can also give a more meaningful name to the images by changing the settings in preferences.

  4. Select the photos you want to transfer and then delete them from the camera.

  5. Click the unplug device icon in the Windows toolbar. Unplug the USB cable from camera and then switch off the camera and microscope.

Image Editing

  1. Adobe's PhotoShop software is installed on the computer if you want to edit the image. You might want to add a micron marker to the image or crop, resize, sharpen, or colour correct the image. I recommend you keep the original image.

Camera Nomenclature

  1. Viewfinder
  2. Red-eye reduction / Self-timer lamp
  3. Lens
  4. Monitor button
  5. Quick review button
  6. Menu button
  7. Control panel
  8. Mode dial
  9. Shutter release button
  10. Mode/Function 1 button
  11. Exposure Compensation 2 button
  12. Command dial
  13. Video output connector and USB connector cover
  14. Zoom buttons
  15. Memory card slot cover
  16. Camera strap eyelets
  17. Speedlight lock-release lever
  18. Built in Speedlight
  19. Focus mode/Manual focus/Delete button
  20. Flash mode/Sensitivity/Thumbnail Button
  21. Image quality/ Image size button
  22. Monitor
  23. Focus area/ Multi Selector

Download PDF version of this document


PT Group Home Materials Algorithms Any Valid CSS!